
PROFESSIONAL GEL NAIL SYSTEM

thegelLOOK®
GELTIP® NAIL EXTENSION SYSTEM
BASIC STEPS:Make sure to manicure the natural nails. Apply a cuticle softener/remover (optional) as directed by the manufacturer. Gently push back cuticles with a cuticle pusher, file or an orange wood stick and remove any excess skin, cuticle and debris from the nail plate. It is NOT necessary to etch or roughen the natural nail. Use a manicure scrub brush with soap and water to thoroughly cleanse hands and nails. Completely dry hands and fingernails before starting.
1. Cleanse the natural nail with CLEANUP® sanitize solution and a lint free nail wipe. Scrub as if you are removing polish. Let dry.


Once dry, apply an even coat of THEGEL® to the natural nails, cure, then cleanse afterwards with CLEANUP® solution to remove the tacky surface. Do all the nails you will applying a GELTIP® to.


2. Size the GELTIP® to the natural nail and (optional) attach a small TIPCLIP® (tip holder) to the free edge of all the tips you will be applying. No need to roughen or "etch" the underside of the GELTIP®


3. Apply THEGEL® to the free edge tip of the natural nail bed and to 1/3 of the underside contact area of the tip. Be generous and place a drop of THEGEL® and swirl the brush onto the underside of the GELTIP®.

-Place the GELTIP® on top of the natural nail. Do this to one nail at a time.

4. Use a large TIPCLIP® (compression tool) to secure the GELTIP® to the natural nail and finger. Remove (if using) the small tip holder after securing. While secure, maneuver the tip to completely cover, is straight and flush with the natural nail and cuticle area, without any air bubbles, before moving to the next step.


-Adjust the amount of gel applied to avoid air bubbles. Usually it means you did not add enough gel.
5. Optional: If you get gel on the cuticle/skin - Use a CLEANUP® brush to remove any excess gel around the cuticle, sidewalls and underneath the nail if needed before curing with a FLASHCURE® lamp.


Hold the lamp directly on top of the clip for 10-15 seconds or under the NAILMADE® Hands Free Adjustable Holder with the FLASHCURE® lamp. Simply place your finger underneath and hold for the same amount of time. Remove the large TIPCLIP® (compression tool) afterwards.
CAUTION: DO NOT flood the nail with CLEANUP® solution before curing.
Flooding the nail with solution before it is cured will cause inferior adhesion and strength. The idea is to clean the brush to remove excess gel with the solution. The brush should only be put in the jar of solution and swirled around to cleanse the gel from the brush. Always wipe the brush clean on a lint free wipe to remove excess solution before cleansing around the cuticle and side wall area of the nail.
NOTE: As an alternative, use a lint free wipe lightly moistened with CLEANUP® solution to wipe around the cuticle to avoid flooding the nail "before" curing.

- FLASHCURE® each thumb nail first before final curing them together in the PROCURE® lamp to save time. Follow up with the final four fingers of each hand.

6. Final cure in an LED/UV lamp for the recommended time according to the manufacturer, the PROCURE® lamp for 45 seconds or a UV lamp for 2 minutes.

7. Cleanse on top of, around the cuticle area and underneath the nail with CLEANUP® sanitize solution and a lint free wipe to remove any stickiness after curing.

8. Gently finish file to clean up excess gel around the cuticle and side folds flush with the natural nail. Use a file or an e-file of choice. No need to file on top of the GELTIP® nail surface.
-Shape the side walls and adjust the length.


9. Use a nylon manicure brush to remove excess dust and any remaining tip filings. A buffing block can be used to help remove left over stubborn filings.

10. Wipe around the cuticle, side folds and underneath the tip with CLEANUP® sanitize solution and a lint free wipe to remove any left over dust before applying additional coats of THEGEL® to further seal and protect. Continue. (Read Below)

PRO RESULTS:
APPLY (1-2) ADDITIONAL COATS OF THEGEL® TO SEAL AND PROTECT BEFORE NAIL COLOR AND/OR NAIL ART. MAKE SURE TO COVER ALL EDGES OF THE NAIL.
CURE EACH COAT IN AN LED LAMP FOR THE RECOMMENDED TIME ACCORDING TO THE MANUFACTURER, THE PROCURE® LAMP FOR 45 SECONDS OR A UV LAMP FOR 2 MINUTES.
CLEANSE AFTERWARDS WITH CLEANUP® SANITIZE SOLUTION AND A LINT FREE WIPE.
NOTE: APPLY A COAT OF THEGEL® FIRST IF YOUR USING THEGEL® PRO COLOR GEL TECHNIQUE TO THE NATURAL NAIL - WITHOUT EXTENSIONS. (SEE BELOW)
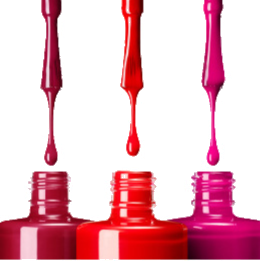
Create Your Own Gel Polish!
Mix THEGEL® with ANY traditional nail polish to turn them into COLOR gel polish.


PRO COLOR GEL TECHNIQUE
1. MIX 1:1 DROPS OF THEGEL® WITH THE SAME AMOUNT OF DROPS FROM THE BRUSH TOP OF ANY TRADITIONAL POLISH NAIL COLOR INTO A SMALL MiX iT Up! GLASS DISH.
FOR BEST RESULTS: USE THEGEL® 1 OZ. / 30 ML. SQUEEZE AND DROP BOTTLE TOP (EASIEST AND MOST ECONOMICAL) OR DROP FROM THEGEL® BRUSH TOP BOTTLE.
2. USE THE SAME TRADITIONAL POLISH BRUSH TO MIX THE TWO PRODUCTS TOGETHER. APPLY THE PRO GEL COLOR MIX USING THE SAME BRUSH.
3. APPLY 1-2 COATS (OR UNTIL YOU ACHIEVE THE DEPTH OF COLOR YOUR LOOKING FOR) OF THE PRO GEL COLOR MIX. CURE EACH COAT IN AN LED LAMP FOR THE RECOMMENDED TIME ACCORDING TO THE MANUFACTURER, PROCURE® LAMP FOR 45 SECONDS OR A UV LAMP FOR 2 MINUTES.
4. APPLY A FINAL COAT - WITH THE BRUSH TOP BOTTLE OF THEGEL® , TO FURTHER BOND, SEAL, PROTECT AND SHINE!
5. CURE THEGEL® WITH AN LED LAMP FOR THE RECOMMENDED TIME ACCORDING TO THE MANUFACTURER, PROCURE® LAMP FOR 45 SECONDS OR A UV LAMP FOR 2 MINUTES.
6. WIPE CLEAN WITH CLEANUP® SANITIZE SOLUTION AND A LINT FREE WIPE TO REVEAL THE MOST BEAUTIFUL, LONGEST LASTING (UNTIL YOUR READY TO REMOVE), SHINIEST COLOR GEL NAILS!
CLEAN IT UP!


- WIPE THE PRO GEL COLOR MIX BRUSH WITH CLEANUP® SANITIZE SOLUTION OR 91% ALCOHOL AND A LINT FREE WIPE OR PAPER TOWEL BEFORE RETURNING THE BRUSH INTO THE TRADITIONAL COLOR POLISH BOTTLE TOP.
- SPRAY OR POUR CLEANUP® SANITIZE SOLUTION OR 91% ALCOHOL INSIDE THE SMALL MiX iT Up! GLASS DISH AND WIPE CLEAN ANY LEFT OVER GEL POLISH COLOR MIX WITH A LINT FREE WIPE OR PAPER TOWEL. REPEAT UNTIL COMPLETELY CLEAN.

A simple system created just for you.
Absolutely stunning results!
